

Table of Contents
- Why Blooming Coffee Makes a Better Cup
- Degassing Coffee Beans: The Science Behind the Bloom
- How to Bloom Coffee: A Step-by-Step Guide
- Coffee Bloom Time: How Long Should You Wait?
- How to Bloom Coffee in a French Press
- Grind Size, Water Chemistry, and the Bloom
- Common Blooming Mistakes and How to Fix Them
- Conclusion
- Frequently Asked Questions
Last Updated: October 4, 2026
Why Blooming Coffee Makes a Better Cup
Blooming coffee is the simple step of pouring a small amount of hot water over fresh grounds and waiting before you brew. According to the Specialty Coffee Association's brewing guidance, this pause lets trapped gas escape so water can reach the coffee evenly.
Here at Tinto Coffee Roasters, we roast in small batches and ship fast, so our beans are often only days off the roast. Fresh coffee holds more gas, the whole reason blooming matters.

Below, we'll show you how to bloom coffee for better flavor, with times, ratios, and common mistakes.
Degassing Coffee Beans: The Science Behind the Bloom
Degassing coffee beans is the release of carbon dioxide trapped inside the bean during roasting, escaping over days and weeks.
When hot water hits the grounds, the remaining carbon dioxide rushes out as bubbles and foam, the bloom phase.
That gas pushes water away from the coffee.
A short pre-infusion, also called pre-wetting, gives the gas time to leave, so the real brew begins with a coffee bed ready to give up its flavor.
How to Bloom Coffee: A Step-by-Step Guide
Learning how to bloom coffee takes about 30 seconds of active work; the rest is waiting. Here's the full pour-over process.
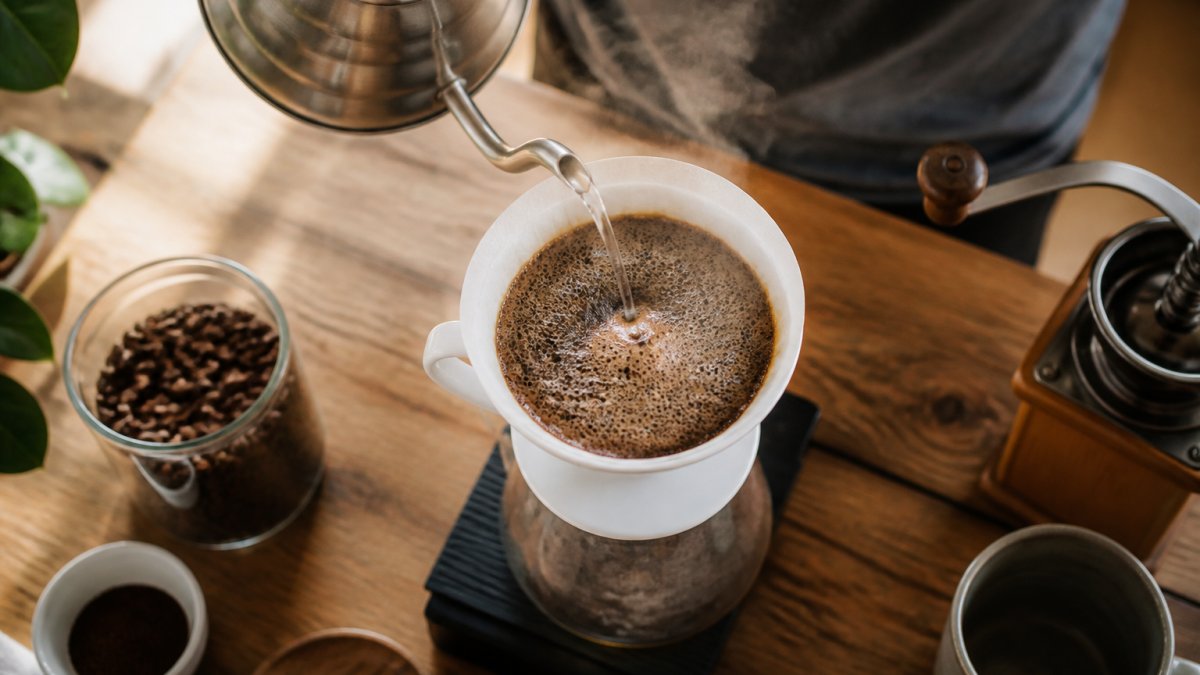
Step 1: Heat Your Water and Rinse Your Filter
Heat water to between 195°F and 205°F. Without a thermometer, boil the kettle and let it sit about 30 seconds, your off-boil water.
Place your paper filter in the dripper and rinse it with hot water to remove paper taste and warm the vessel. Dump the rinse water out.
Step 2: Add Coffee and Start the Bloom
Add your grounds to the filter. A common starting point is a 1:16 ratio, about 22 grams of coffee to 350 grams of water.
Pour just enough water to wet all the grounds, roughly twice the coffee's weight, about 44 grams for 22 grams of coffee, in a slow spiral from the center outward.
Step 3: Wait, Then Continue Brewing
Wait 30 to 45 seconds, then continue pouring in slow circles until you hit your total water weight. Total brew time should land around 3 to 4 minutes.
Coffee Bloom Time: How Long Should You Wait?
Coffee bloom time is 30 to 45 seconds for most pour-over brews, covering nearly every roast level and grind size. But the clock is a starting point, not a rule, the bloom itself tells you when it's done.
Past a minute, water in the dripper cools and pulls less flavor. Under 30 seconds, the carbon dioxide hasn't finished escaping, you'll see the bed still bubbling when you start your main pour.
Reading the Bloom: Visual Indicators of a Healthy Degas
Most guides tell you to wait 30 seconds but not how to confirm the bloom worked. Here's how to tell a real bloom from a wasted pour.
A healthy bloom looks like this:
- A domed, mounded bed that rises above the rim of the dripper before settling back down
- Fine, even bubbles across the entire surface, not one big central geyser
- A pale tan to dark brown foam cap that holds its shape for several seconds
- A faint crackling or popping sound as CO₂ escapes (audible on very fresh beans)
A weak or failed bloom looks like this:
- Flat, matte surface with no rise, the water just sits there
- Large, sparse bubbles that pop immediately instead of a fine foam
- Dry patches of grounds poking through the wet bed
- Water draining straight through the coffee before the wait is over
What Each Visual Signal Actually Means
| What You See | What It Tells You | What To Adjust |
|---|---|---|
| Big dome, fine bubbles, slow deflate | Fresh beans, healthy degas | Nothing, proceed with main pour |
| Flat surface, no rise | Beans are stale or already degassed | Shorten bloom to 20 seconds; expect a milder cup |
| One large central bubble | Pour was too aggressive in one spot | Pour in a slower, wider spiral next time |
| Dry patches after the pour | Not enough bloom water, or uneven saturation | Increase bloom water to 2.5x coffee weight; swirl gently |
| Water drains through instantly | Grind too coarse, or filter not seated | Tighten grind one step; check filter fit |
| Foam collapses within 10 seconds | Very fresh beans releasing gas fast | Extend bloom to 45-60 seconds |
Freshness Table: Bloom Time by Roast Age
| Roast Freshness | Bloom Time | What You'll See |
|---|---|---|
| 1-5 days off roast | 45 seconds | Big dome of foam, audible crackle |
| 1-3 weeks off roast | 30-40 seconds | Moderate bubbling, steady foam cap |
| 1+ month off roast | 20-30 seconds | Light fizz, little foam, fast deflate |
Darker roasts hold more gas and reward a longer bloom. Lighter roasts degas faster, so a light-roast bean at two weeks may bloom like a dark roast at one week.
How to Bloom Coffee in a French Press
How to bloom coffee in a French press follows the same idea in a different vessel.
Wait 30 seconds for a thick layer of foam to rise, then pour the rest of your water, stir again, and set the timer.
Steep 4 minutes total, then press the plunger down slowly.
One note: French press coffee is unfiltered, so a coarse grind matters more here than bloom timing.
Grind Size, Water Chemistry, and the Bloom
Two variables quietly decide whether your bloom works: grind size and what's dissolved in your water. Here's the mechanism behind each.
How Grind Size Changes Bloom Efficiency
Grind size controls two competing forces: surface area (how fast water reaches the coffee) and bed permeability (how fast water drains through). The bloom sits at that intersection.
- Fine grind (espresso to moka range): High surface area means CO₂ escapes fast and violently, you'll see an aggressive, foamy bloom. But the dense bed also traps gas and slows drainage, so water can channel around dry pockets. Fine grinds bloom fast but unevenly.
- Medium grind (typical pour-over): The sweet spot. Enough surface area for a visible bloom, enough permeability for water to wet every particle. This is why 30-45 seconds works for most pour-over recipes.
- Coarse grind (French press to cold brew): Large gaps between particles let water rush past the grounds before they fully saturate. The bloom looks weak not because the beans are stale, but because the water isn't staying in contact long enough. Coarse grinds need a slower pour and often a longer bloom.
A practical test: if your bloom looks flat and dry with a medium grind, tighten one step. If water runs straight through before the 30-second mark, loosen one step. Change one variable at a time so you can attribute the result.
Water Chemistry: The Invisible Variable
Water is roughly 98% of your brewed coffee. What's in that water matters as much as the beans.
Magnesium and calcium bind to coffee's flavor compounds and carry them into the cup.
Bicarbonate (alkalinity) is the buffer. In small amounts it smooths acidity.
Chlorine and chloramine, added to most municipal water supplies for disinfection, react with coffee compounds and produce a distinctly flat, papery, or medicinal taste.
A Simple Water Fix
Use filtered water. According to the Water Quality Association, home carbon filtration removes chlorine and sediment without stripping the minerals that help extraction. If your tap water is very hard or very soft, a pitcher filter or a low-mineral bottled water (look for total dissolved solids around 75-150 ppm on the label) is a reasonable middle ground.
Specialty shops often build water from scratch, distilled water plus a mineral packet or a pinch of Epsom salt and baking soda, but even a basic filter moves the needle more than most gear upgrades.
A Note on Origin and Density
Bean origin plays a role too. Colombian beans grown at altitude tend to be dense and hold up well to a full bloom, which is part of why we source the way we do. Their tighter cell structure means they degas more slowly and reward a slightly longer bloom than a softer, lower-grown bean of the same roast date.
Common Blooming Mistakes and How to Fix Them
Most blooming mistakes come down to water temperature, timing, or pour speed. Here's how to spot and fix each.
| Mistake | What Happens | The Fix |
|---|---|---|
| Water too hot | Scorched, bitter taste | Let the kettle rest 30 seconds off boil |
| No bloom at all | Flat, sour cup | Add a 30-second pre-infusion |
| Pouring too fast | Channeling through the bed | Pour in a slow spiral |
| Too little water | Dry pockets in the grounds | Use 2x the coffee's weight |
| Stale beans | Weak bloom, dull flavor | Check the roast date |
The biggest one is skipping the bloom because you're in a hurry. That 30 seconds is the cheapest upgrade in coffee. It costs you nothing but patience.
Don't judge beans by how big the bloom looks. Fresh beans foam more, but foam isn't flavor, a modest bloom from week-old coffee can still make a great cup.
Conclusion
Fresh coffee holds gas, and gas blocks flavor. A 30-second bloom fixes that, the easiest upgrade you can make to your morning cup.
At Tinto Coffee Roasters, we roast to order within 48 hours and seal every bag for freshness, so the beans that reach your kitchen still have the life a bloom is built for. For that same quality without the ritual, "The Sophia" Colombian Pods deliver full, even extraction in under a minute.

Get started with Tinto Coffee Roasters and taste what a proper bloom does for a fresh, small-batch roast.
Frequently Asked Questions
How long should you let coffee bloom for?
Most pour-over recipes call for a bloom time of 30 to 45 seconds. Start your timer when you finish pouring the initial water. If the coffee is very fresh, you may see bubbles for longer, but 30 to 45 seconds is enough to let carbon dioxide escape. For French press or immersion brewing, a 30-second bloom works well before you add the rest of your water.
Does blooming coffee actually improve the flavor?
Yes. Blooming releases carbon dioxide trapped in freshly roasted beans, which would otherwise interfere with water reaching the coffee grounds. When you bloom coffee, you allow for even extraction, which means fewer bitter or sour notes and a smoother, more balanced cup. Skipping the bloom often leads to channeling, where water runs through weak spots in the coffee bed and leaves some grounds under-extracted.
Do you need to bloom coffee for a French press?
Yes, blooming helps in a French press too. After adding coarse grounds to the carafe, pour just enough off-boil water to saturate them, then wait 30 seconds. You will see the coffee slurry bubble and expand. Then pour the rest of your water, stir gently, and steep for four minutes. This step improves extraction even in immersion brewing.
What happens if you skip the coffee bloom step?
Skipping the bloom can lead to uneven extraction. The carbon dioxide still in the grounds repels water, causing channeling, where water finds the path of least resistance and bypasses some coffee. The result is a cup that tastes simultaneously weak and bitter. Taking 30 seconds to bloom coffee is a small step that makes a noticeable difference in your final cup.